Mastering the Masquerade
Identify the prey you want to mimic when targeting NW cutthroat trout.
Sea-run cutthroat trout in Puget Sound, Washington, feed on a variety of prey in the spring as they prepare for spawning and take advantage of the abundance of food sources found in the Pacific Northwest. Some common food sources for sea-run cutthroat trout in the spring include:
Baitfish: Herring, anchovies, smelt, and other small baitfish are a primary food source for sea-run cutthroat trout. These fish are often found in schools and provide a high-energy meal for the trout.
Crustaceans: Shrimp, crabs, and other crustaceans are also important prey items for sea-run cutthroat trout. These small invertebrates are abundant in Puget Sound and provide a protein-rich diet for the trout.
Insects: Aquatic insects such as mayflies, caddisflies, and stoneflies can be found in the waters of the Pudget Sound and are a seasonal food source for sea-run cutthroat trout, especially in freshwater tributaries.
Squid: Squid are another common food source for sea-run cutthroat trout in the area. These cephalopods are often attracted to lights at night, making them an easy target for hungry trout.
Forage Fish: Forage fish such as sand lance and surf smelt are important prey items for sea-run cutthroat trout, especially in shallow waters and near shorelines.
Emerging Insects: As spring progresses, emergent insects like midges and mayflies become more abundant, providing yet another important food source for Washington's sea-run cutthroat trout.
When targeting sea-run cutthroat trout this spring, you will want to consider using lures or flies that mimic these natural food sources to increase your chances of success. Here are a few tried and proven lure options you may wish to try next time you venture out on Washington's Puget Sound.
1. Sonic BaitFish: The Sonic BaitFish can be cast, swam, jigged or trolled and features three attachment points, enabling flutter and vibration, and can include two hooks. Few lures, if any, provide this kind of versatility. View the Sonic BaitFish Tech Guide. Top colors for this fishery are Silver Blue, Glow Orange, and Silver.
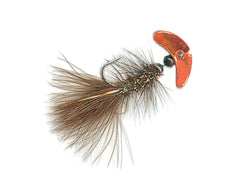
2. Smile Blade Fly: The Smile Blade Fly features a modified woolly bugger pattern and an interchangeable Smile Blade with proven versatility and fish-catching abilities worldwide. Cast it, troll it, or drift it to catch cutthroat trout. Popular colors for this fishery are as follows: Gold Sparkle with Olive and Peacock body, Transparent Scale with Black and Purple body, and Flame Mirror with Brown and Bronze body.
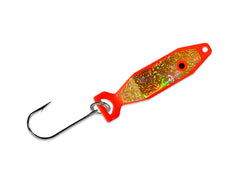
3. Humdinger: The Hum Dinger lure is a favorite among trout, kokanee and salmon anglers. This spoon, available in two sizes, emits a constant "Hum" that attracts fish and creates strikes. The Hum Dinger makes noise because of the shape of the lure, which makes it dart back and forth, causing the split ring to rattle. This is a great lure choice for mimicing baitfish.
Mack's Lure's Hum Dinger lure is available in a variety of baith colors, however, the top colors you'll want to consider for targeting sea-run cutty are the Gold Sand/Red, Pink Sand/Nickel, and the Copper/Orange. These lures are available in two sizes - the heavier 1/2 oz version is good for deeper water.
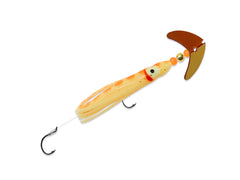
4. Cha Cha Squidder: This buoyant Cha Cha 2" Squidder features a Cha Cha Float, which helps to reduce snags and keep the rig in the strike zone with an extremely enticing flash and wobble action trout can't resist. can emulate almost any type of bait. Cha Cha Pill float gives it buoyancy and helps it give off a more natural presentation. Top colors for this fishery are White, Blue, and Gold.
Pay attention to the behavior of the trout and the presence of baitfish or other prey items to adjust your fishing tactics accordingly.
Read this related article by Mack's Lure Pro Staffer, Jason Brooks - Targeting Sea-Run Cutthroat Trout in the Puget Sound.
Remember to always check local regulations and practice responsible fishing practices to help conserve the sea-run cutthroat trout population in Puget Sound. 🎣🦐🐟 #SeaRunCutthroatTrout #PugetSoundFishing #SpringFeedingHabits,#Best Lures for Cutthroat